Scene Coverage: You Can’t Film It All

We covered what scene coverage means in film, in the preceding article Build Your Shot List Like A Pro. Covering a scene is often done with many angles of the same action to get enough shots for the editor, but an entire scene on every angle can burn up time and burn out actors.

Contributed by Glen Berry
Edited by Stavros C. Stavrides


We cannot shoot everything
The Director must have a refined vision
Provide the editor with coverage

What is Coverage and Shooting Ratio

As we see the scene playing out in our heads, we get a read for the emotional material of the scene ahead of time. We start identifying the shots we’ll need to make the scene work. We note the shot types noted on a list – Close Up, Medium Shot, Two-shot, etc.

Coverage is filming enough material from different angles of the same action to provide the editor with sufficient redundant material to flexibly cut the scene together. 

We know that enough coverage allows the editor to adjust the rhythm of a scene, even its meaning, purely through the flexibility of shots. If you only shoot one angle, the editor has no choice but to use that angle.

Ideally, we also have to think of how these angles may cut together in the edit. When the scene is edited, its length is a fraction of the total amount of footage we filmed. This brings up the Shooting Ratio.

The shooting ratio is the difference between how much footage we shoot versus how much is used in the final film. For example, if we film 200 minutes of video for a 100-minute edited piece, this is a 2-to-1 ratio (2:1). If we shoot 2000 minutes of raw footage for the 100-minute final edit, we shoot at a 20:1 ratio.

The Cost of Too Much Coverage

While some directors want to shoot the whole scene from every angle to have more choice in editing. Producers are concerned about the shooting ratio.

In the old days, it was because film was expensive to buy and too costly to process at the lab. so we had to plan well for a reasonable shooting ratio – maybe 12:1 for the average budget. This was the limit. 

Today, digital media is way cheaper than film, and there are no lab costs. So let’s fire away, right? Not so fast. Math can still kill us. 


This is a support article linked from the “Scene Coverage” chapter in Cyber Film School’s Multi-Touch Filmmaking Textbook


While digital media itself is cheaper, time at the backend is not cheap. Think of data management time. Costs of ingesting and drive storage; the labour involved in screening for logging and transcriptions; and the editor’s time for screening and annotating everything. In the end, a high shooting ratio still costs. So ratio costs. Ask a producer. 

Sure, when you’re making an eight-minute short with maybe seven or eight scenes, and just a few angles on each scene, fire away. Shoot the full performance with every angle – if your actors can take it. But on longer works like a feature, we have to learn to be more selective. Not only do we plan our shots, but we plan our cuts. 

Sure, we still want to give our editor flexibility by providing options, but with some planning, there is a method to being selective enough to respect the shooting ratio while getting enough coverage. 

Remember these four rules:

  • You Cannot Shoot Everything
  • The Director’s Vision is in Charge
  • Balance Coverage and Resources
  • Plan The Cuts

You Can’t Shoot Everything

For practical reasons, especially for long scenes, we sometimes cannot shoot the entire length of the same action from every angle. 

There may not be enough time in the day for it. You wear out your crew and your actors. Performances will not stay fresh after four takes on the eighth angle. There is no need to do all of it. It can be a waste of time. 

A seasoned director identifies what parts of each angle of the scene are really necessary, and shoots that – with a bit of overlap at each end of the action. 

Be clear on where that shot starts and where it ends, what angle will run into it in the edit, and what shot runs out of it. To do this, you must have a good idea of every shot transition in advance. 

Of course, there may be occasional uncertainty on a certain angle from time to time, and the director wishes to cover the entire length for safety from that angle, but this should be more the exception for a confident director and not a habit

The director must have a general plan pre-production and follow through on that plan in production, while still leaving a bit of room for the editor to improvise. 

The Director’s Vision is in Charge 

The director puts together a plan for every shot and transition and creates that material in production. The editor then reads the material and puts it together the way that the director intended

An editor should be able to look at the footage and read the director’s intent, able to see the plan that the director created just by viewing the footage.

Thelma Schoonmaker has won three Academy Awards for Editing – for “Raging Bull”, “The Aviator”, and “The Departed”. Although enormously talented, she is also very self-effacing. She once said that she did not deserve an award for “Raging Bull”, she simply put it together “the way that Marty shot it”, referring to the director, Martin Scorsese.

So how do we as directors, plan the cuts in our heads, and shoot for that plan, while still giving our editors some flexibility to transition between shots? The first step is to find the moments in the scene where you will need each shot and when we will not need each shot. 

Balance Coverage and Resources

We need to make decisions as directors. We have a read on the emotional material of the scene, we should be able to select moments in the scene where we will need certain shots and other moments where we will not. 

As you will recall from the “Fistful of Dollars” example, the scene’s classic construction moves between wide shots and closer as it builds to the climax. 

Suppose, for example, a director’s vision may not call for a wide shot at the climax of the scene. Instead, the director wants to be tight on the actors at the climax to see the expressions on their faces. The wide shot may be useless for that, so in the director’s opinion, there is no point in shooting that portion of the action wide. 

In doing this we create intentional ‘gaps’ in our coverage, where parts of the action have not been covered from certain angles. But these gaps should be planned out in advance, while still allowing enough overlap for key bits of the action. 

Conclusion

We want sufficient coverage to cut the scene together, cover the action, and provide options to the editor without shooting the entire scene from all angles. We seek a balance between flexibility and the resources (energy and time) we expend on coverage. 

Many moments can be exploited by the editor to make a seamless transition but the savvy director would be wise to know where they are in advance and incorporate that into his or her plan for when to start and end a shot. 

Knowing where these transitions (or cuts) take place requires at least a little knowledge of editing and some practice. 

In the meantime, on your short films with fewer angles and brief scenes, go ahead and shoot everything on every angle; over time, with enough practice in shooting and cutting these films, you exercise the ability to plan your cuts, better preparing you to engage in longer and more complex projects. 

SUMMARY

The director cannot shoot all angles in their entirety. It can wear out the cast and crew, waste time and kill morale. The director must have a vision.

The director must know all angles and perspectives and make decisions about what parts of the scene to cover from which angles.

Give the editor options by covering the action in the scene from more than one angle.

NEXT >>>
PLAN YOUR SHOT TRANSITIONS
to allow for smooth edits

<<< PREVIOUS
BUILD YOUR SHOT LIST

An Analysis
of Scene Coverage
from Sergio Leone’s “A Fistful of Dollars”


Make Cinema Your Language

Cinema is a language we all understand, but not everyone ‘speaks’ it–directors do.

This interactive, self-guided textbook is a director’s toolbox, made for Apple Books.

Embrace a solid foundation with a future-proof, classic combo of theory, technique, history, and critical thinking. 

Gain practical, adaptable creative skills and insight that transcend technological changes, be it a camera, mobile device, or AI.

 Visit the Book Page Now

5. Three Pitfalls of the Editor

Beginning editors often make the same mistakes when putting together first time projects. Here are three common pitfalls to which the editor can fall victim, and how to avoid them.

Contributed By Glen Berry
Edited By Stavros C. Stavrides

Important Concepts

Leave Out the Unnecessary
Don’t Think too Much
Exit Late, Leave Early

Just because they shot it, doesn’t mean you have to use it.

When the the analog film world gave over to less costly digital technology, production teams had a tendency to shoot massive amounts of footage and deliver an enormous amount of coverage to the editor.

This may be advantageous in the sense that it gives the editor a lot of options. However, editors now need to develop a new strength they didn’t need in the age of film: selectivity.

With more footage, the editor must realize that many good shots cannot be used or are not necessary to tell a story. This is why the post-production team should be separate from the production team.

If a person was there for the creation of the shot during production, they often have some kind of emotional attachment to the footage. You need a decision-maker in the edit who cares little about how hard it was to capture a shot, or how long it took.

The only thing the editor should care about is telling the story. That may mean rejecting shots that may have the best lighting, performance or timing.

The inexperienced editor may try to include many extra shots that were created in production but have no place in the final. There’s no reason why that extra material cannot be included in the rough cut — the director will want to see it anyway. But the smart editor will eliminate all shots that do not advance the story by the time the project evolves into the rough cut.

Don’t Overthink

Many times, edits will contain certain shots that might make sense intellectually but don’t play well on playback. For example, an errant shot within the sequence that isn’t on screen long enough to make sense of it.

Upon careful review, it makes intellectual sense why the shot would be included if you can stop the movie and look at the shot in the timeline. The audience cannot do this. The audience will see the movie play from start to finish once at one continuous speed, and feel it.  


This article is drawn from the “Five Phases of Production” chapter in Cyber Film School’s
Multi-Touch Filmmaking Textbook


This is how you need to view the sequence, like an audience, even though you’ve seen the cut a dozen times. Rely more on gut sense than the brain.

This is an emotional medium. Analyze but do not overanalyze. Avoid being hyper-sensitized to logical problems in your edit that are not going to be noticeable to the audience.

Many “problems” that you are seeing cannot be detected unless you slow down the movie and repeatedly review it shot by shot for countless hours. This is the process that we go through but that is also why you should try to adhere to the editing rule of thumb: one hour per finished minute for the rough cut. That helps prevent you from spending so much time with the edit that you start to overthink it.


Be sure to read our support article
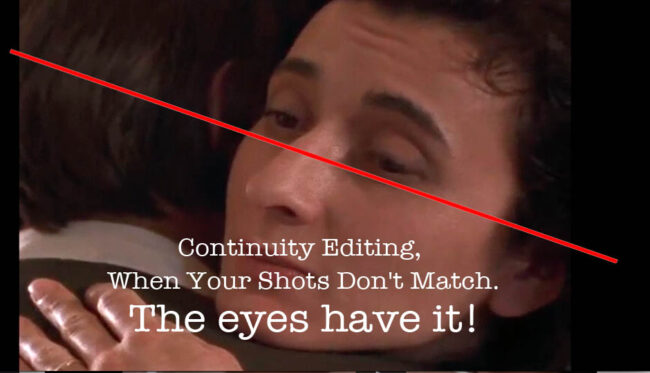
Continuity Editing: When Shots Don’t Match

Matching eyelines on continuity cut
Dealing with mismatching action, hair, or misplaced hands from shot to shot.

3. Exit Late, Leave Early

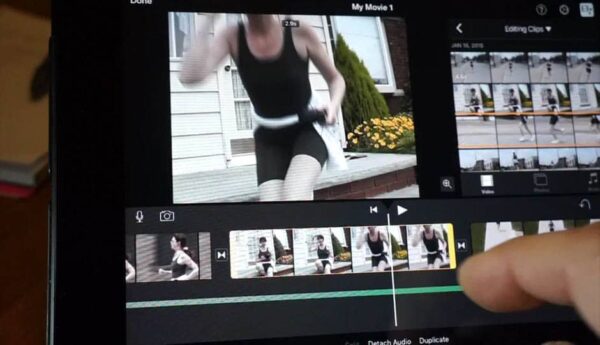
Another common error of the beginning editor is forgetting to trim their shots. When placing shots in the timeline to create a rough cut, it is advisable to place the full action with extra material at the head and tail. However, once you have determined your shot selection and order, you need to cut the heads and tails.

Try starting late on the action. Do not leave the shot on a door before it opens. Cut the shot as the door is in motion.

Don’t leave the shot after the actor has finished delivering their line.

Try cutting the shot before they have finished and bring the audio into the next shot to see the reaction of the other actor to the previous line.

These are some ways to create a flow to your movie. If you leave all the extra material in, the pace can drag and you’ll test the patience of your audience. There’s no easier way to make your movie dull and listless than to leave all those stale bits of pre-action and post-action in your piece.

You are not an editor yet if you don’t know how to tighten up your edit and make the footage propel the story along.


Be sure to read further application of “Exit Late, Start Early” at Screenwriting stage in out article:
Scene Design: Exit Late, Leave Early


Summary

• One of the harder parts of editing is choosing to leave things out. Just because you have the footage doesn’t mean you have to use it.

• Intuitive editing often leads to the best decisions. Agonizing over every possibility can destroy perspective.

• You can tighten the edit a great deal by trimming out less vital action at the head and tail of a shot to keep the story moving along. Hold on to your moments and cut the rest into a smart clip.

<< PREVIOUS
Editing The Narrative Short

Rough cut and fine cut assembly; creating the movie in post-production.


Speech As Character

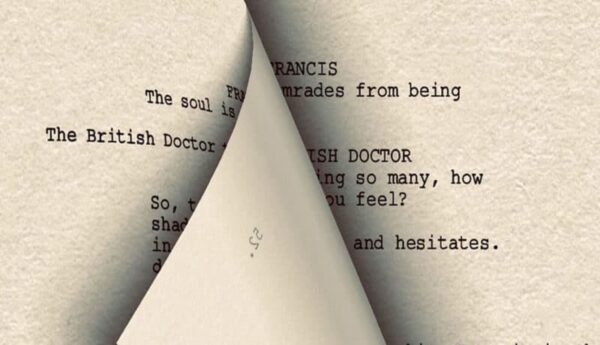
A film character’s screen dialogue should be written as a language to be spoken and heard, but many beginner screenwriters mistakenly write dialogue to be ‘read. It’s in the character’s speech where a screenplay can show off some mastery.

By Charles Deemer
Edited by Stavros C. Stavrides

Updated October 25, 2022


For writers who aspire to stylistic brilliance of prose in models such as Henry James, William Faulkner, and James Agee, screenwriting can be a disappointing field.

That would be a bit like an Olympic runner joining the grade school track team. Strong writing skills in the traditional literary sense simply are not as important to a screenwriter as strong storytelling skills.

A minor exception, however, is the writing of screen dialogue. Writing dialogue is the primary area in which a screenwriter gets to show off a little mastery of language.

But dialogue for the screen is written in a special kind of language, and in my university classes, I am struck by how many students enter with no knowledge of this.

They are writing dialogue as a language to be read, when in fact dialogue must be written as a language to be spoken and heard. Those two universes are light-years apart.

People Speak in Fragments

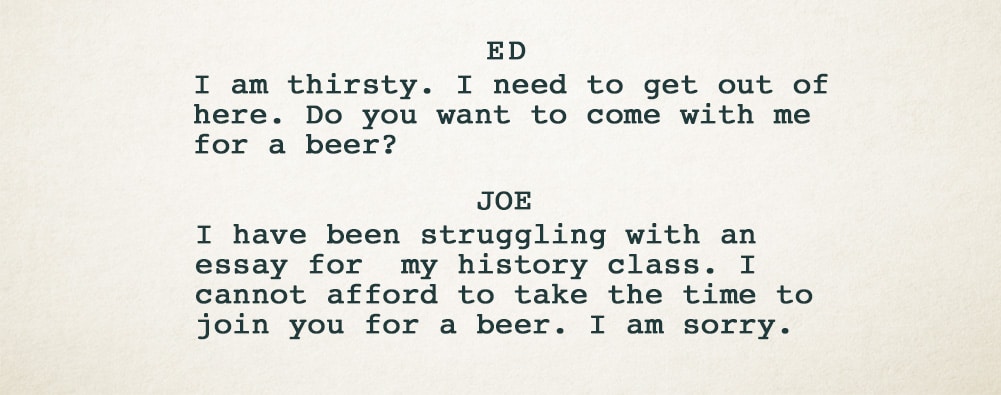
Picture a scene in which one student roommate asks another if he would like to go out for a beer. A beginning screenwriter might write something like this:

The above is poorly written for several reasons.

At the level of rhetoric, this language is too formal. The language we speak every day is much less formal than written language. Real spoken language is filled with sentence fragments and word contractions, the sort of things that are frowned upon by English teachers expecting formal written prose.

Ironically, often the better the student in terms of English literary skills, the worst the dialogue they write. That’s because they’re trained so strongly in writing formal prose which is seldom appropriate for dialogue.

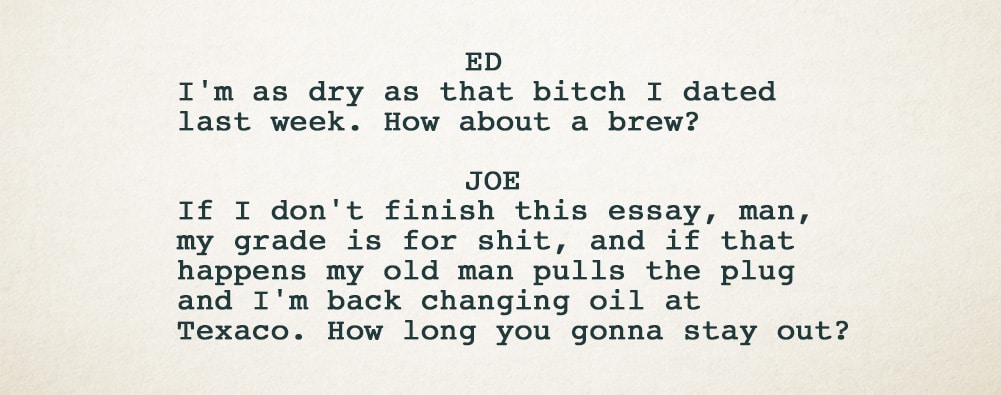
A more informal, spoken translation of the above might be:

But we can still improve this dialogue by making it more personal, making it more of a revelation of character by giving it some “attitude”.

Screenplay dialogue must serve at least one of two purposes: it must either: Move the plot forward, or it must reveal character.

Give Dialogue An Attitude

How do we personalize dialogue? By giving it an attitude, in the sense that dialogue becomes a verbal imprint of individual character. Hence:

See the difference?

The first rewrite improves the rhetoric by making it informal, spoken speech, but the dialogue is still primarily informational.

In this second rewrite, we’ve infused the dialogue with attitude and wrapped the information in the point of view of the character. We begin to learn something about who the characters are by the way they speak.

Lines with an attitude” is a good way to describe dialogue that reveals character, and it’s a major key in writing unforgettable spoken language.

Subtext In a Character’s Speech

In his book “Stein on Writing”, Sol Stein asks four questions of dialogue, establishing the conditions it must meet:

What is the purpose of the exchange – does it begin or heighten an existing conflict?
• Does it stimulate [our] curiosity?
• Does the exchange create tension?
• Does the dialogue build to a climax or a turn of events in the story or a change in the relationship of the speakers?

Stein also notes how interesting dialogue is often oblique. He gives many examples in his book. One is this (boring) exchange:

“How are you?”
“Fine”

A boringly ordinary exchange, right?

But when we change to:

“How are you?”
“Oh, I’m sorry, I didn’t see you.”

we create interest because the person does not answer the question, but establishes subtext – something more than meets the eye is going on here.

Ordinary speech is boring, and good dialogue is carefully crafted to give spoken exchanges tension and mystery, direction and conflict. What is not said directly but nonetheless communicated is “subtext,” meaning under the literal surface of speech.

A pejorative term for poor dialogue that has come into fashion is “on the nose” dialogue, which is the opposite of dialogue. Russin and Downs define it this way in their book “Screenplay: Writing the Picture”:

“When a character states exactly what he wants it’s called on-the-nose dialogue. The character is speaking the subtext; there is no hidden meaning behind the words, no secret want, because everything is spelled out. But most interesting people, and certainly most interesting characters, don’t do this.
~ “Robin Russi, William Missouri Downs

Example of Subtext

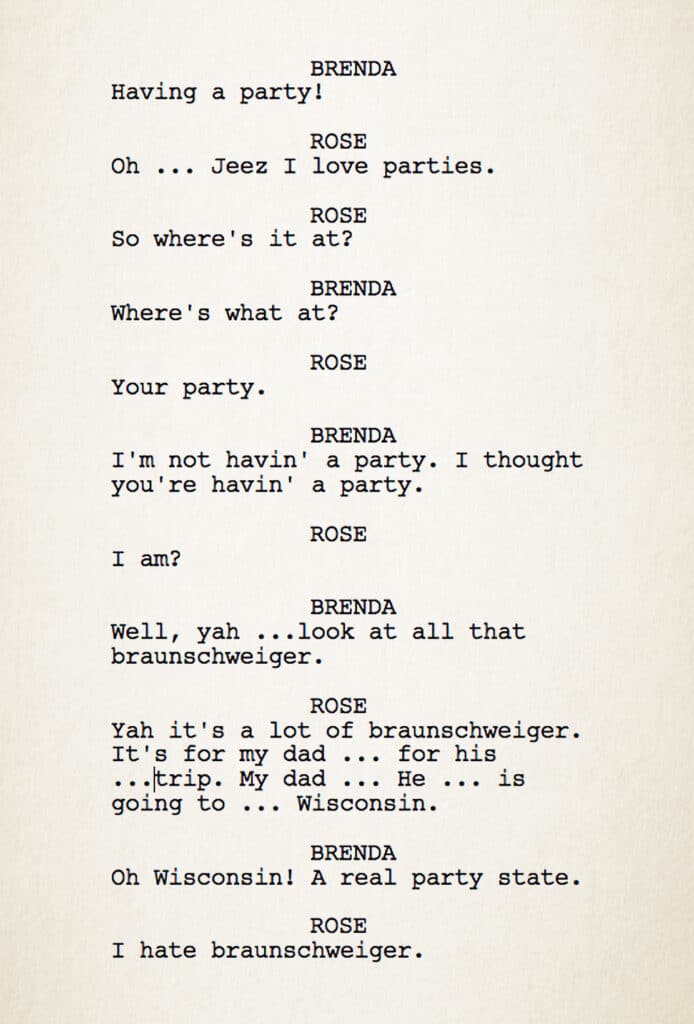
Below is a very simple scene from David Lynch’s movie “The Straight Story” written by John Roach & Mary Sweeney. It’s an excellent example of subtext:

Before Alvin begins his incredible journey riding a lawn mower across the country to visit his distant brother, his daughter Rose goes to the grocery store to buy him supplies.

Rose is fearful about her father’s trip. Notice how Rose’s feelings of grief and fear transfer to a simple grocery item, a braunschweiger sausage.

Yet this scene is not about the Braunschweiger, but about her anxiety over her father’s trip.

Rose takes items to the counter. Brenda is the checkout cashier.

The most ordinary everyday settings such as a checkout counter can serve as an arena for revealing emotional material.

And such a scene doesn’t take very much time at all when handled by a skilled screenwriter, so every line works. The focus is tight, and that idle chit-chat doesn’t dilute the scene’s energy.

In the hands of an amateur, this scene could be disastrous, full of small talk that goes nowhere.

Here the progression is logical, direct, concise and efficient, all moving toward the unspoken but evident “punch line,” in which the subtext is:

I hate that my Dad is going on this trip!”

When you write dialogue with subtext, you are letting the audience discover meaning through the heart before they understand it through the head.

Expository (obvious and overly factual) dialogue aims at the head, at understanding.
Subtext, on the other hand, aims at the heart – at feelings.

It is more powerful writing to make your audience feel first and understand second.

Summary

Here are some things you can do to improve your skills at writing dialogue: 

Read your script aloud! The written word is not the spoken word. Even better, get your script into the hands of the actors. By doing a “staged reading” of your script, your ear will tell you what your eye will miss when it comes to poor dialogue

Listen to the speech of people around you. On the bus, in a restaurant, at a party. Listen especially for idiosyncratic rhetorical patterns that you can “borrow” and adapt to your work.

However, do not make the mistake of believing that “real speech” is the goal. Dialogue is always crafted – it is, in fact, more interesting than real speech (usually) but gives the illusion of being real speech.

Write with subtext. People normally don’t speak as directly as characters do in a soap opera. Let them speak obliquely, around their true emotions, so that the listeners/audience will discover meaning through feelings, through the heart.


When you write dialogue with subtext, you are letting the audience discover meaning through the heart before they understand it through the head.

Rewrite your dialogue and read your script aloud again. 

More Free Articles


We publish an interactive  Apple Book, a structured film program based on leading 1st-year film programs.
More Info