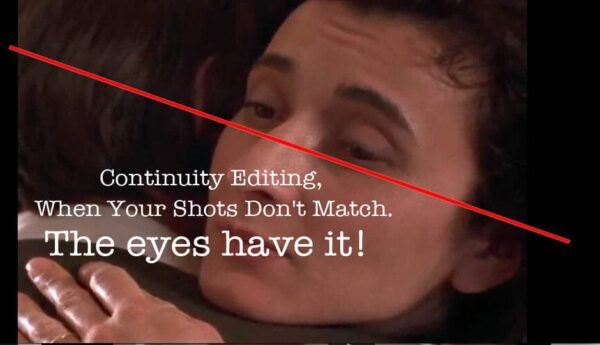
What could be a frightful continuity error for a newbie editor, is a fresh challenge for a pro editor to solve – “Focus on the eyes!”
Continuity & Rhythm in Editing
But sometimes the editor is handed a set of shots – long, medium, close, cutaways, cut-ins, etc. They are meant to be cut together ‘seamlessly’; the action is supposed to match where one shot cuts to another as a continuity cut.
Below is a continuity editing example in a dance number between Sean Astin and Emily Hampshire. The scene is covered with several shot sizes of identical action. When edited, the action appears continuous as the shots intercut.
The most common mistakes have to do with continuity and rhythm, which both rely on the quality of the number of shots that cover a scene.
This article is a reformatted excerpt from “Scene Coverage” in Cyber Film School’s Multi-Touch Filmmaking Textbook
During production, a few continuity details get missed while covering a scene – a cup in an actor’s left hand in one shot changes to her right hand in the next. The clothing does not match as we cut from one shot to the next.
Screen direction problems show up where an actor or camera has crossed the axis, so when the shots cut together actors suddenly face the wrong direction. See our article on maintaining Screen Direction issues here.
New editors often fret over these flubs, but what is a continuity error to a newbie is a challenge that seasoned pros look forward to solving. Their solution is to focus on performance and eye lines and performance
In the following example, we forced the cut without strict continuity on the action. However, the eye line is consistent and we follow the flow of the story through the actors’ connection.
Now replay the above and examine the woman’s hands. Notice that in each cut, they do not match the action.
Even when they embrace, we jump forward in time. We don’t notice the mismatched action because the editor draws us to the performance. We are caught up in the scene’s rhythm.
“Dede” Allen was one of cinema’s all-time celebrated ‘auteur’ film editors, and the very first editor to be awarded a single-card head credit as Editor, which is now commonplace. She’s known for The Hustler (1961), Bonnie and Clyde (1967), Dog Day Afternoon (1975), and Reds (1982). She was also known as Hollywood’s ‘go-to’ film doctor to fix problems in major studio films.
To solve continuity issues between shots, Dede advises to ‘cut’ with the performance, with the eyes.
Importance of Rhythm
Continuity in a film is not the only consideration when editing a scene. Although rhythm in editing is less about movie continuity, it is more related to continuity in terms of conveying ‘subtext’. Let’s explore subtext.
Picture this: an editor cuts a scene following the script exactly as written. His cuts are smooth and perfect. The director screens it, then yells to the editor, “You missed the whole point!” Much like cracking a good joke, telling a story is all in the timing or rhythm, which may not be evident on the script page.
The editor in this scenario mistook pauses in the performance as “dead space.” Editors must screen everything and know the story and director’s intent in order to spot the subtext and cut accordingly. The subtext is what the character thinks or believes. It’s often found in silent pauses, over which the editor has full control.
In the back-to-back clips below, spot the truth and the lie in this dialogue: One dialogue scene is cut two different ways – same setup, same script, same dialogue. The first cut sounds like a straight-up explanation. The second cut lets us read the behavior of the players and what they are saying to each other.
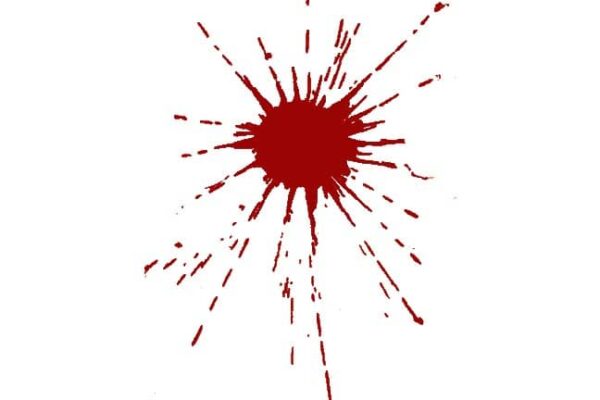
Here are two fake blood recipes for filmmakers looking for realistic gore for their fans – a corn syrup recipe for oozing blood, and a flour mixture for blood splatter.
We have two recipes here – Syrup-based and MB2-based fake blood. Syrup-based works for the aftermath splatter of your gory zombie fest or shoot-up massacre. If you’re looking for realistic oozing, running, or dripping, MB2 is the way to go.
Now get your apron and let’s get cooking! Let us know how you made out in the comments below.
Syrup-Based Fake Blood Splatter
For some real ooze, get a bottle of Karo Syrup (or any other light corn syrup). Add red food color then gradually add a little blue and just a touch of green until it looks right.
Of course, most of the food color you use should be red, but as you color balance the formula remember this:
Real blood in a fresh cut or wound is bright red, and the longer it sits outside of the body it turns darker because it actually ‘rusts’ – blood contains iron.
By experimenting with the amount of blue and green, you should be able to come up with some very realistic-looking blood. However, this will not “run freely from a wound”, but it will do well for bloodstains that have set in zombies, gunshot victims, etc.
Look for just the right amount of ooze depending on how long ago the wound was inflicted. The longer it’s been in open air, the drier it gets.
MB2-Based Fake Blood Ooze
This blood formula is less messy to make, and some say is more realistic. But we think that is because its texture offers us a natural-looking splatter.
On the upside, there’s no sugary syrup here that would attract creepy crawlies (though bugs on an open wound could offer a bit more ick.
Prepare the Flour Base:
1/2 to 2 level tbsp all-purpose flour per cup (250ml) of water.
Mix flour into the water completely (no lumps).
Bring the flour base to a boil, then reduce the heat to a simmer.
Simmer for 30 minutes while stirring frequently.
If any surface scum appears, mix it in well – it makes a slightly slimy base with low surface tension. Like blood, it soaks and spreads well.
Mix and Add Food Color
For 1 cup (250ml) of the flour base: – Mix 1 oz Red food color (Durkee brand or equivalent) – 1/8 teaspoon (.6cc) green food color (Durkee brand or equivalent)
Add the color to one cup of the prepared flour base.
Cautions:
MB2 Formula’s shelf life is fairly short (a few days) at room temperature.
MN2 blood does not go rank but ferments a bit and loses viscosity with time.
I have not tested the MB2 formula for refrigerated or frozen storage. Worth a try though.
MB2 Blood temporarily stains skin but seems to wash out of cotton clothes OK.
Let us know how you made out in the comments below!
Make Cinema Your Language
Cinema is a language we all understand, but not everyone ‘speaks’ it–directors do.
This interactive, self-guided textbook is a director’s toolbox, made for Apple Books.
Embrace a solid foundation with a future-proof, classic combo of theory, technique, history, and critical thinking.
Gain practical, adaptable creative skills and insight that transcend technological changes, be it a camera, mobile device, or AI.
We covered what scene coverage means in film, in the preceding article Build Your Shot List Like A Pro. Covering a scene is often done with many angles of the same action to get enough shots for the editor, but an entire scene on every angle can burn up time and burn out actors.
Contributed by Glen Berry Edited by Stavros C. Stavrides
We cannot shoot everything The Director must have a refined vision Provide the editor with coverage
What is Coverage and Shooting Ratio
As we see the scene playing out in our heads, we get a read for the emotional material of the scene ahead of time. We start identifying the shots we’ll need to make the scene work. We note the shot types noted on a list – Close Up, Medium Shot, Two-shot, etc.
Coverage is filming enough material from different angles of the same action to provide the editor with sufficient redundant material to flexibly cut the scene together.
We know that enough coverage allows the editor to adjust the rhythm of a scene, even its meaning, purely through the flexibility of shots. If you only shoot one angle, the editor has no choice but to use that angle.
Ideally, we also have to think of how these angles may cut together in the edit. When the scene is edited, its length is a fraction of the total amount of footage we filmed. This brings upthe Shooting Ratio.
The shooting ratio is the difference between how much footage we shoot versus how much is used in the final film. For example, if we film 200 minutes of video for a 100-minute edited piece, this is a 2-to-1 ratio (2:1). If we shoot 2000 minutes of raw footage for the 100-minute final edit, we shoot at a 20:1 ratio.
The Cost of Too Much Coverage
While some directors want to shoot the whole scene from every angle to have more choice in editing. Producers are concerned about the shooting ratio.
In the old days, it was because film was expensive to buy and too costly to process at the lab. so we had to plan well for a reasonable shooting ratio – maybe 12:1 for the average budget. This was the limit.
Today, digital media is way cheaper than film, and there are no lab costs. So let’s fire away, right? Not so fast. Math can still kill us.
This is a support article linked from the “Scene Coverage” chapter in Cyber Film School’s Multi-Touch Filmmaking Textbook
While digital media itself is cheaper, time at the backend is not cheap. Think of data management time. Costs of ingesting and drive storage; the labour involved in screening for logging and transcriptions; and the editor’s time for screening and annotating everything. In the end, a high shooting ratio still costs. So ratio costs. Ask a producer.
Sure, when you’re making an eight-minute short with maybe seven or eight scenes, and just a few angles on each scene, fire away. Shoot the full performance with every angle – if your actors can take it. But on longer works like a feature, we have to learn to be more selective. Not only do we plan our shots, but we plan our cuts.
Sure, we still want to give our editor flexibility by providing options, but with some planning, there is a method to being selective enough to respect the shooting ratio while getting enough coverage.
Remember these four rules:
You Cannot Shoot Everything
The Director’s Vision is in Charge
Balance Coverage and Resources
Plan The Cuts
You Can’t Shoot Everything
For practical reasons, especially for long scenes, we sometimes cannot shoot the entire length of the same action from every angle.
There may not be enough time in the day for it. You wear out your crew and your actors. Performances will not stay fresh after four takes on the eighth angle. There is no need to do all of it. It can be a waste of time.
A seasoned director identifies what parts of each angle of the scene are really necessary, and shoots that – with a bit of overlap at each end of the action.
Be clear on where that shot starts and where it ends, what angle will run into it in the edit, and what shot runs out of it. To do this, you must have a good idea of every shot transition in advance.
Of course, there may be occasional uncertainty on a certain angle from time to time, and the director wishes to cover the entire length for safety from that angle, but this should be more the exception for a confident director and not a habit
The director must have a general plan pre-production and follow through on that plan in production, while still leaving a bit of room for the editor to improvise.
The Director’s Vision is in Charge
The director puts together a plan for every shot and transition and creates that material in production. The editor then reads the material and puts it together the way that the director intended
An editor should be able to look at the footage and read the director’s intent, able to see the plan that the director created just by viewing the footage.
Thelma Schoonmaker has won three Academy Awards for Editing – for “Raging Bull”, “The Aviator”, and “The Departed”. Although enormously talented, she is also very self-effacing. She once said that she did not deserve an award for “Raging Bull”, she simply put it together “the way that Marty shot it”, referring to the director, Martin Scorsese.
So how do we as directors, plan the cuts in our heads, and shoot for that plan, while still giving our editors some flexibility to transition between shots? The first step is to find the moments in the scene where you will need each shot and when we will not need each shot.
Balance Coverage and Resources
We need to make decisions as directors. We have a read on the emotional material of the scene, we should be able to select moments in the scene where we will need certain shots and other moments where we will not.
As you will recall from the “Fistful of Dollars” example, the scene’s classic construction moves between wide shots and closer as it builds to the climax.
Suppose, for example, a director’s vision may not call for a wide shot at the climax of the scene. Instead, the director wants to be tight on the actors at the climax to see the expressions on their faces. The wide shot may be useless for that, so in the director’s opinion, there is no point in shooting that portion of the action wide.
In doing this we create intentional ‘gaps’ in our coverage, where parts of the action have not been covered from certain angles. But these gaps should be planned out in advance, while still allowing enough overlap for key bits of the action.
Conclusion
We want sufficient coverage to cut the scene together, cover the action, and provide options to the editor without shooting the entire scene from all angles. We seek a balance between flexibility and the resources (energy and time) we expend on coverage.
Many moments can be exploited by the editor to make a seamless transition but the savvy director would be wise to know where they are in advance and incorporate that into his or her plan for when to start and end a shot.
Knowing where these transitions (or cuts) take place requires at least a little knowledge of editing and some practice.
In the meantime, on your short films with fewer angles and brief scenes, go ahead and shoot everything on every angle; over time, with enough practice in shooting and cutting these films, you exercise the ability to plan your cuts, better preparing you to engage in longer and more complex projects.
SUMMARY
The director cannot shoot all angles in their entirety. It can wear out the cast and crew, waste time and kill morale. The director must have a vision.
The director must know all angles and perspectives and make decisions about what parts of the scene to cover from which angles.
Give the editor options by covering the action in the scene from more than one angle.