Build Your Film Shot List Like A Pro


When reading a script or recalling a film, we often idealize its vision and the picture is flawless in the perfect world of our minds. But as directors planning our own films, it’s an entirely different exercise.

Updated December 15, 2022
by Glen Berry, edited by Stavros Stavrides


What Is A Shot List?

If you don’t know where to begin building your shot list, you need to get a read on the emotional content of your material.

The director studies the script and imagines how the scene will play visually. The process is called ‘breaking down the script.’  A director lists the types of shots that will ‘cover’ the scene. The list of shots is called a Shot Breakdown. 

The Shot Breakdown is then communicated to the creative team as a Shot List, storyboard, or both.
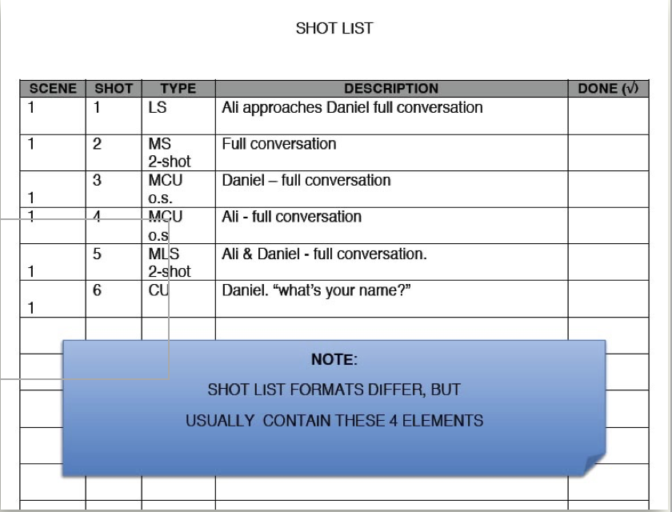
Shot list example shows sequence of shots on a spread sheet

What a shot list does need to contain, at minimum, is a list of shots where each shows a description of the action and shot size – Long Shot, Medium Shot, Close Up, etc. 

The shot number and its corresponding scene number help organize the shooting schedule. The list may then be organized into an order of filming on the schedule.

Building Your Shot List

When reading a script or recalling a film, we often idealize its vision and in the perfect world of our minds, the picture is flawless. But as directors planning our own films, it’s an entirely different exercise.

As visual people reading a script on the first pass, we may see the movie play out in our heads. The visual treatment plays as we go from line to line. However, as readers, we’re mostly feeling the effect as we read, not so much focused on the precise order of shots and how they specifically flow together.

Similarly, when we think back to our favorite movie, we can recall specific shots, effects, and sequences, but not every shot from every scene, the order of shots, how long each stayed onscreen, and how each transitioned into another.

If we were focusing on all that as an audience, and not hooked on the story, that film is in trouble!

When reading a script or recalling a film, we often idealize its vision and in the perfect world of our minds, the picture is flawless. But as directors planning our own films, it’s an entirely different exercise.

Once we’re past story structure and script, we need a well-developed idea of how the visual elements unfold in our movie. Creating a shot list, shot by shot, scene by scene, sequence by sequence, we make a plan. 

It needn’t be perfect at first, but a strong vision of the outcome will guide us as we select various shot types, moving from master shots to close-ups, with purpose.

So once again, we face a blank page as we prepare to begin our shot list. How to begin? Let’s start with a scene.

REMEMBER: We are presenting a conventional approach to scene construction. As professional directors, we determine the key moments and plan accordingly, rather than select shots in a cookie-cutter template. However, if you don’t know where to begin, it’s a way to get started and depart from there.


This post is a support article for the “Shot Vocabulary” chapter in Cyber Film School’s 
Multi-Touch Filmmaking Textbook


Breaking It Down
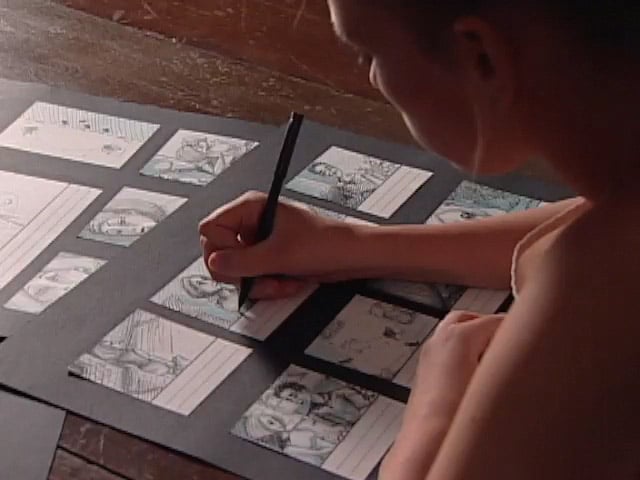
Story board is a visual version of the shot list.

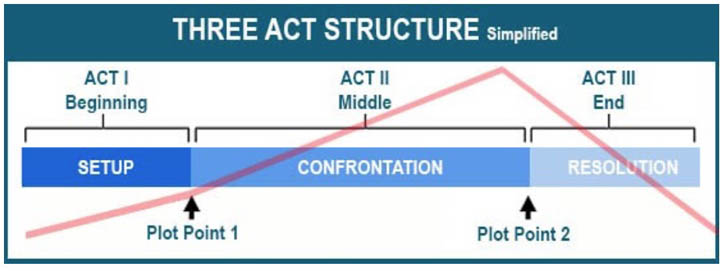
Many of us are aware that an entire film has a dramatic curve – beginning, middle, and end. We may have even identified the movie’s plot structure with ‘high points’ like:

  1. Exposition
  2. Inciting Moments
  3. Rising Action
  4. Conflict
  5. Climax, and
  6. Resolution

We’ll examine these High Points further below.

Where an entire picture’s structure may be analyzed with these high points, so can almost every scene of our script. Each scene may be structured in the same way, with its resolution at the end of each scene driving us to the next scene.

Think of a scene as a kind of visual paragraph. In literature, where a paragraph on the page is made up of sentences and words, a sequence of shots in a film makes up a scene.

Our task right now is to select the size and angle of each shot and sequence them to construct a scene.

Shot Size & Angle

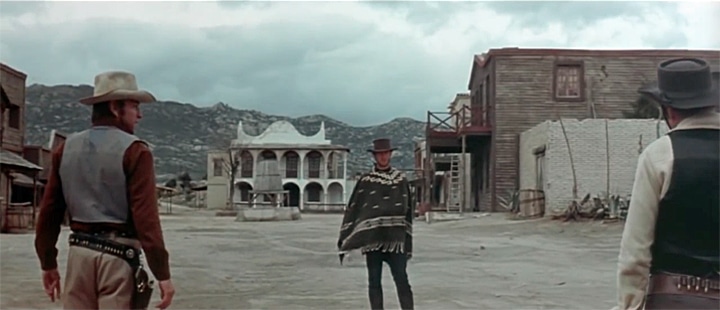
In general terms, the Wide Shot (or Long Shot) is often expository, offering us factual information about the scene’s setting, and/or establishing the relationship between objects and the changes between them. In short, it’s the scene’s ‘setup’.

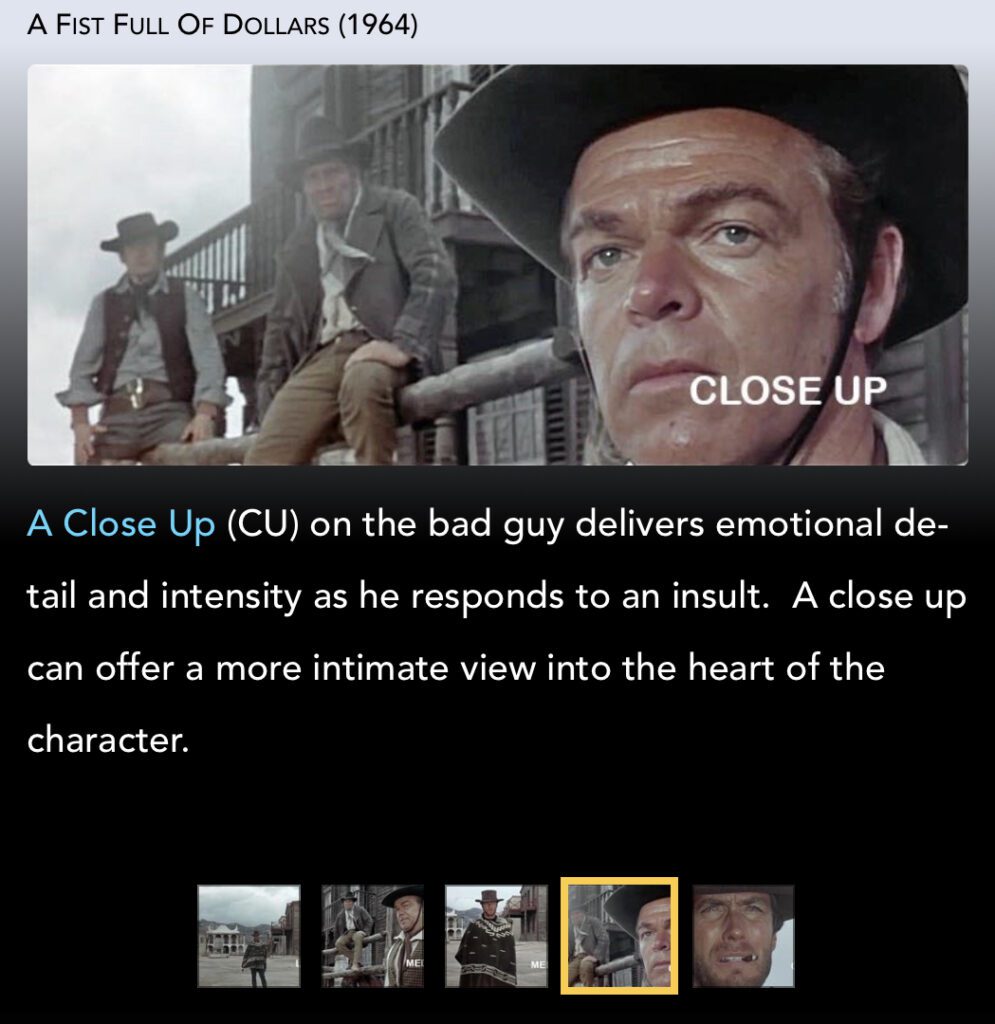
The close-up tends to be concise or expressive, calling attention to more specific detail meant to convey a specific emotional impact.


Wide Shot exposes enormous amounts of information. It is commonly used as a tool for conveying large amounts of information to the audience – geography of the space, time period, setting, mood, activity, characters in the space, and all action taking place.
Compared to the Long Shot, the Close-Up is hyper-focused. It conveys context, emotion, or grandiose effect. Trained on a person’s face, it delivers emotional detail so the audience gets to feel the impact on the character and more closely identify with their circumstance.

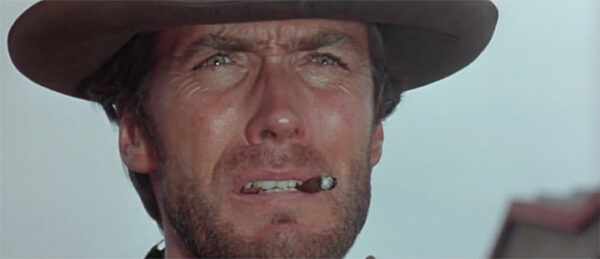
Extreme close-ups are often used at the climax of the scene to heighten the intensity of the moment for the audience.

As the action rises toward the climax of the scene, a common technique is to ‘tighten’ the shots incrementally from the wide shot to a close-up.

A Wide Shot exposes enormous amounts of information. It is commonly used as a tool for conveying large amounts of information to the audience – geography of the space, time period, setting, mood, activity, characters in the space, and all action taking place.

A movie’s entire story is commonly structured with rising action to a climax, then a resolution. A single scene is often written in the same way, then visually treated by its director with shot sizes to rise and fall in intensity, through shot selection.

If we were to stack up shots in the order of wide shot, full shot, medium shot, and close up, we would have the effect of ramping up the scene’s intensity as it progresses up the ladder of rising action of the dramatic curve.

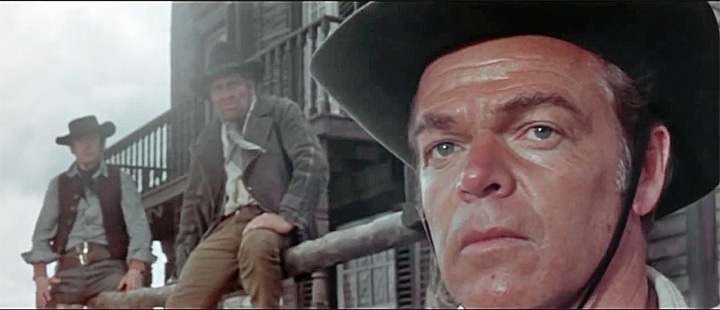
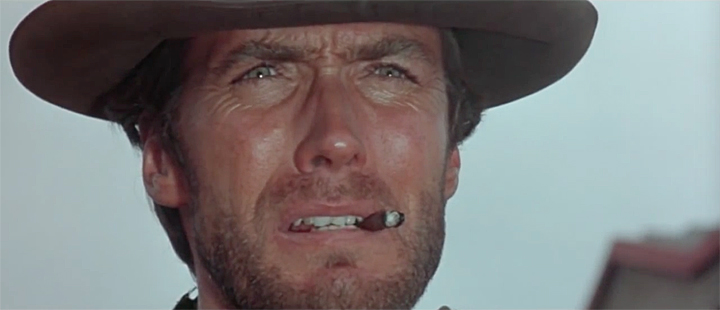
Here is an example of how the shots stack up in a sequence of rising action in a confrontation scene from the classic “A Fist Full of Dollars”, directed by Sergio Leone and starring Clint Eastwood as our protagonist.

1. Long Shot
2. Medium Shot
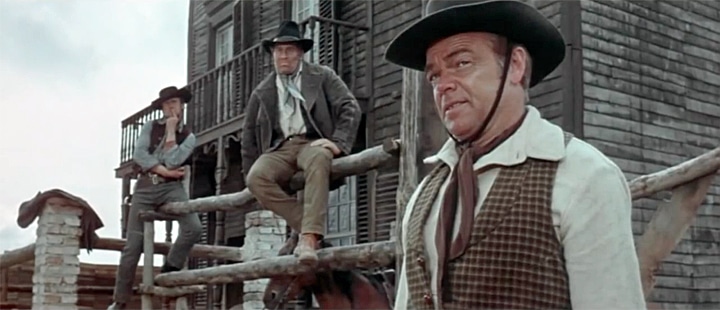
Shot list Medium Close up

Compared to the Long Shot, the Close-Up is hyper-focused. It conveys context, emotion, or grandiose effect. Trained on a person’s face, it delivers emotional detail so the audience gets to feel the impact on the character and more closely identify with their circumstance.

3. Medium Shot
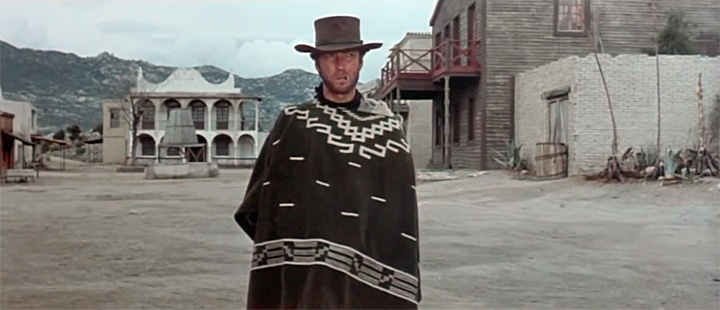
Cant Eastwood Medium Shot Fistful of Dollars

 4. Close Up

Fistful of Dollars showdown shot construction

5. Close Up

Extreme CU Clint Eastwood Fistful of Dollars

Full Scene Study

Now let’s study the actual scene.  This scene appears in Act I of the movie and has preceding scenes and following scenes. The scene contains:

  1. Exposition
  2. Inciting Moments
  3. Rising Action
  4. Conflict
  5. Climax, and
  6. Resolution

As discussed earlier, we can find these elements in the dramatic curve of an entire movie, but also find them contained within one scene. First, we’ll identify these high points, then examine the scene’s shot construction.

Read the subtitles for cues. Then study the extended time-coded notes below the video.

The ‘High Points

At 0:00 – The Exposition in this clip begins with our protagonist talking to himself. This sets the stage for our conflict. He’s a killer looking for a job. “I don’t work cheap,” he says and is ready to show off his skills to a potential employer.

0:27 – We see this potential employer taking a watchful position on a balcony.

0:30 to 1:15 – The Inciting Moment begins as our protagonist walks a path of danger. He starts with, “Get three coffins ready” as he passes an undertaker and heads toward his targets, who notice him approaching.

1:15 – The Rising Action kicks off as he confronts the men. His conversation draws them deeper into a course of conflict with moments of escalation along that path.

1:55 – The Peak Moment when he throws back his cloak to reveal his gun. His intent to draw is the point of no return, as recognized by one of the antagonists in the foreground.

2:32 – The Climax of the scene, where the protagonist draws his pistol and kills the four men, the conflict is now resolved.

2:25 – With Resolution, the climax unravels. Note the shots now ‘relaxing with wider framing.  The Sheriff appears to arrest our protagonist who refuses to acknowledge the Sheriff’s authority and walks away.

In our Denouement, what do we about the protagonist? He is a killer willing to provoke conflict, killing four men, then walking away in the face of authority.

If we were to watch this scene on its own, unaware that it is part of a larger film, we could easily assume that the protagonist is really the antagonist, since he is the one provoking the fight and doing the killing. However, as the hero seeks an apology from the men about insulting his horse in a previous scene, we get the hint that the men are mean-spirited killers who deserve some get-back.

Because this scene is part of a longer film, information, and events from previous scenes play into the conflict contained in this scene. Thus, the resolution to this scene is incomplete – not the end of the story. Rather, it sets the stage for the further conflict to come in later scenes.


This post is a support article for Cyber Film School’s Multi-Touch Filmmaking Textbook.


The Shots

From 0:00 to 0:30. We open with a Medium Shot (MS) for the exposition of our character and then transition into a long, wide shot. That is our establishing shot that puts the geography of the space into context. These are expository shots.

We then move into some tighter shots, some MS, and Over-the-shoulder two-shots. We then come back out to another wide shot at 0:52 to establish the geography of the corral at the other end of the street,  but we’re still not as wide as the opening establishing shot.  We have the same, wider shot on the reverse angle at 1:15.

From 1:16 to 2:32, our conflict, we see no more wide shots.  We progressively move in tighter and tighter from MS and Two-Shotss to Close-ups. This is no coincidence as we move forward and up the slope of intensity on our dramatic curve, to increasingly tighter shots.

When our protagonist throws back his serape and both sides are committed to conflict, we see nothing but CUs from here to the climax (1:55 to 2:32). The moment of highest intensity is covered in CUs and ECUs.

Immediately after the climax of the scene, we back out of the tight shots for the denouement (2:46). We drop back off of the dramatic curve in terms of intensity and back out to wider shots, although it is an incremental step back from the height of the climax.

We stress once again:  this is a classic scene construction, where wide shots are used for exposition and close-ups for the rhetorical. Wide shots are used in the beginning with progressively tighter shots going up the dramatic curve. The tightest shots, close-ups, are used at the climax and we back off to wider shots for the denouement

If you don’t know where to begin building your film’s shot list, you need to get a read on the emotional content of your material:

Where are the moments of greatest intensity?

What is expository (wide) and what is rhetorical (close)?

Where are the turning points of your scene?

Upon what does the conflict hinge and what actions reveal the nature of the characters in the scene?

If you can identify these moments, you will have an idea of how to use framing in a series of tighter or wider shots to heighten intensity and focus the audience’s attention on the moments in your story.

As the action rises toward the climax of the scene, a common technique is to ‘tighten’ the shots incrementally from the wide shot to a close-up.

NEXT: Scene Coverage: You Can’t Film It All >>


Preview our MultiTouch Filmmaking Textbook

Extreme close-ups are often used at the climax of the scene to heighten the intensity of the moment for the audience.

Here is an example of how the shots stack up in a sequence of rising action in a confrontation scene from the classic “A Fist Full of Dollars”, directed by Sergio Leone and starring Clint Eastwood as our protagonist.

If we were to stack up shots in the order of wide shot, full shot, medium shot, and close up, we would have the effect of ramping up the scene’s intensity as it progresses up the ladder of rising action of the dramatic curvA Wide Shot exposes enormous amounts of information. It is commonly used as a tool for conveying large amounts of information to the audience – geography of the space, time period, setting, mood, activity, characters in the space, and all action taking place.
or
Get More Info


Screen Continuity

If there’s one argument on the set with repeat-offender status, it’s often about screen direction – and not just for newbies. Seasoned pros even get into it.

By Stavros C. Stavrides


Screen Direction

Once screen direction is established, it must be maintained in each progressive shot. This also applies to the direction our performers move, face, or look at, even when they are not moving. 

When screen direction fails, actors can seem like they’re not facing each other in conversation, not looking at what they are supposed to be looking at, or instantly changing the direction of travel back to where they started. We could have one confused audience!

Now bear in mind, this is a rule. That means you may deliberately break it for the desired effect, such as in a montage. One filmmaker may break a rule knowingly to achieve an effect, another may stumble into it accidentally. Which would you rather be?

When Screen Continuity is misapplied, it can jar or confuse your audience, and really tee off your editor.  

Axis of Action, Imaginary Line, 180-Degree Rule

Here’s a quick primer video:

YouTube player

So how do we keep track of screen direction while we’re managing the many aspects of a hectic production?

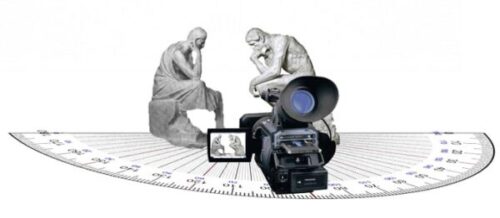
The Imaginary Line, or ‘Axis of Action’, or the ‘180-Degree Rule’ is the key tool used by filmmakers to maintain screen direction. It works like this:

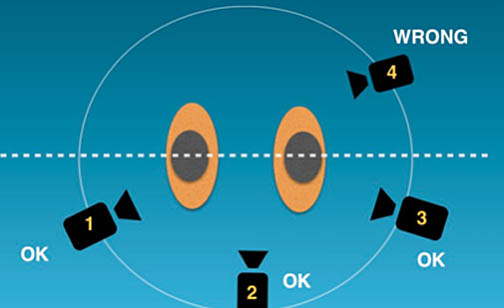
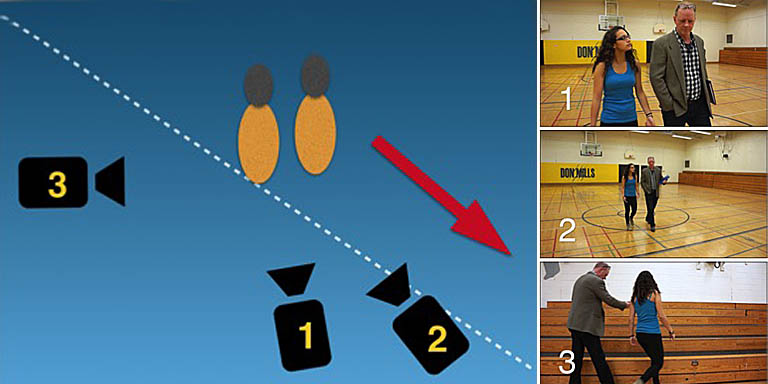
As we look down on the two subjects in this diagram, we draw an imaginary line through them, in the direction they move or face.

Imaginary Line, or Axis for Continuity of Screen Direction

If all shots are done from one side of the axis (shots 1,2,3), they cut together with consistent screen direction.

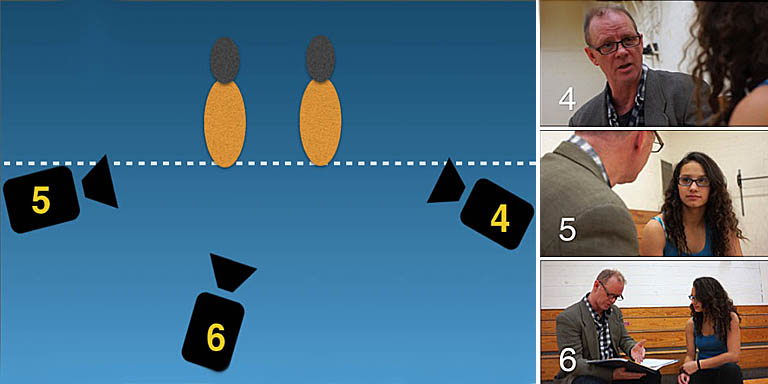
In the following example, a teacher and student walk and talk, then sit at a bench. This rule guarantees both screen direction and matching eye lines.

A Working Example

Correct Screen Continuity movement

Shots 1, 2 & 3 are filmed from the same side of the imaginary line (the axis). Subjects move left to right in every shot. These shots cut together seamlessly, preserving a left-to-right walking direction.

Correct Screen Continuity Dialog

Shots 4, 5 & 6 at the bench also stick to one side of the imaginary line. When shots are cut together, the eye lines will match. The actors appear to face each other instead of away.

When It Works:

YouTube player

When It Fails:

YouTube player

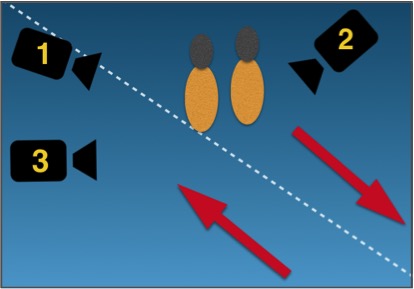
Shot #2 above steps on the ‘wrong’ side of the line.

Imaginary line or axis crossed affects continuity

When #2 shot cuts with the others, the subjects appear to change direction.


This article is a brief drawn from the ‘Screen Continuity’ chapter of
Cyber Film School’s MultiTouch Textbook


Remember:

Your subject is free to travel cross-screen, toward or away from the camera – directional movement will also always be intact as long as the camera doesn’t cross the axis.

In the following excerpt from our Book page, the clip from Boyz ‘n the Hood (1991) examines some tricky continuity when actors look off-camera and follow movement in the frame. Again, the camera stays on one side of the line, but subjects and their eye lines may freely move.  Watch boy number two move his gaze in response to offscreen movement. Play this video a few times for a good study, and imagine how you would plan this coverage. 

YouTube player
Boyz ‘n the Hood (1991)

Can We Ever Cross the Axis?

The rule says you cannot, but as with many rules, there are loopholes.  If we use one of the following techniques to avoid can avoid jarring the audience, we can smoothly cross the axis within the scene and resume coverage from the other side. Here are come ways to that:

Actor or Camera Crosses Axis

  • You can cross the axis if any of the actors are seen changing screen direction within a shot. We then resume the rest of your coverage from that new side.
  • Precede an axis change with a neutral shot. A neutral shot is one where the subject moves directly toward or away from the camera so that the sense of direction appears neutral – neither left nor right.

These techniques visually trick an audience, so we can use this lapse of screen direction to cross the axis and change screen direction on the next shot:

Here’s an example where an actor is neutral then changes direction in a shot:

YouTube player
Neutral Shot shifts from neutral to directional

Insert a Cutaway Shot

Cut to a cutaway shot, such as a couple sitting on a bench, a bird, or a stream. In the example below, it’s a dog. We then change the axis in the following shot, and shoot the rest of the shots from that side. This may be the most clever way to hide the fact you’ve crossed axis by mistake.

Crossing of the axis by using a cutaway. Watch for it at the 20-second mark.

Alternatively, you can dolly or otherwise move the camera across the axis during the shot so the audience sees the move, then shoot the remaining shots on the new side of the axis. The camera actually crosses DURING the shot. 

Now that we’ve been through the basics, there’s a lot more about screen continuity to cover in later posts, such as dealing with a meandering or zigzag path, talking through and moving through doorways, among others. But for now, keep this info in your pocket for that inevitable day you find yourself in an argument on the set. Or better still, share it for that “I told you so” moment.  It could save everyone a whack of valuable production time – and headaches in the edit!


Writing Screen Action – Part Two

In Writing Action – Part One, we showed “What To Write“, the first of three decisions involved in how to write the action portions of a screenplay. Here in Part Two, we show how top screenwriters format action in filmic beats without insulting the director.

By Charles Deemer
Edited by Stavros C. Stavrides

UPDATED December 7, 2022


Show, Don’t Tell

In Part One, What to Write, I showed how the screenwriter’s task is to write what is seen on the screen, not in the extraordinary detail of literary fiction as many beginners do, but simply and directly for the screen.

But there’s another common beginner mistake when writing action. Like fiction novelists, they get inside a character’s mind.

Further down, we reveal how to use ‘white space’ to subtly ‘direct’ the film’s action.

Consider a scene that starts like this:

INT. APARTMENT – NIGHT

Joe opens the door and turns on the light. He steps into the room. He senses that someone has been here. He wonders if he’s been robbed or what. He rushes to the bedroom.

Although we write the action literally as if we are watching the movie unfold before us, notice some flexibility here. When we say “He wonders if he’s been robbed,” it’s not direct action, but the subtle difference is important. It allows room for the actor to show it. There is some flexibility here, to be sure.

For example, one might write: “He looks puzzled and disturbed. Has someone been in his apartment? He rushes to the bedroom.” Such a subtle question clarifies the motivation, in the present time, for the previous description and serves as a clue for the actor.

What we try to avoid is expository information in the action element that is not communicated on the screen through either action or dialogue. For example:

Sam sinks into the couch and opens the divorce papers. He’s been married to Helen for fifteen years. He reaches for the phone to call his lawyer

Sam sinks into the couch and opens the divorce papers. He’s been married to Helen for fifteen years. He reaches for the phone to call his lawyer.

The audience cannot know how long Sam has been married, nor can we yet see that he’s calling his lawyer. These are not said in dialogue nor demonstrated in the action or visual cues. Your audience is not the reader in this sense, but the person WATCHING THE MOVIE.

Always be aware that you are writing a blueprint for a movie, not a literary document. You therefore must accept many more writing restrictions than those found in other forms of writing such as novels.


This post is a support article for the “Screenwriting” chapter in Cyber Film School’s
Multi-Touch Filmmaking Textbook


Break Up Action Into Visual Beats

In the old days, writers used technical jargon like shot sizes, angles, and camera moves in their scripts. As we reveal in “Making Sense of the Screenplay Format” this practice has long been verboten.

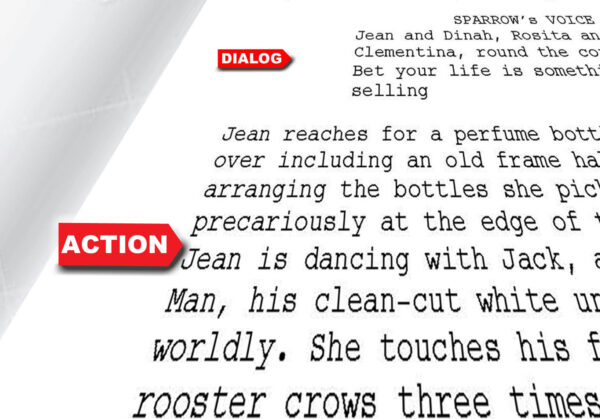
Yet the screenwriter has a very powerful tool in the way he or she places action on the page. It’s simply called ‘White Space.’

Few beginners write as if they are aware of this – even many experienced screenwriters fail to apply this element of screenplay craft.

White Space

We consciously use “white space” to direct the movement and include the visual cues of your story.

The way you define your paragraphs in your action element determines how white space appears on the page, and this has subtle but important consequences.

Again, let’s look at an example. Here’s an extended action sequence as many beginners would write it.

Many beginners would write the following sequence as one paragraph:

Sally comes outside onto the porch, closing the door behind her. She tests it to make sure it’s locked. She looks in the mailbox and takes out the mail, putting it in her purse. She walks down the steps and to her car in the driveway. She unlocks the door and gets in. She gets out again and goes back up the steps and puts the mail back in the mailbox. Back to the car, where she starts the engine and backs out of the driveway.

Although the exposition is technically direct, experienced screenwriters use white space to break down the action into several beats, as if each action is one visual setup. We are in a sense “directing without directing.”

Here is the above paragraph again, but now broken into beats for every distinct action.

Sally comes onto the porch and closes the door. She checks that it’s locked.

She takes the mail out of the mailbox. She puts it in her purse.

She walks to her car in the driveway. She unlocks it and slides in behind the wheel.

She sits. Then she gets out of the car.

She goes back to the mailbox and returns the mail.

She returns to the car and gets in. She starts the engine.

The car backs out of the driveway.

Clever, huh? Notice several things:

By breaking up the paragraph into seven short paragraphs like cuts in a movie, we’ve isolated each of the visual beats of the sequence.

By no means are we ‘directing’ this film in shot sizes, angles, and camera moves. We do in fact suggest in a very subtle way, the individual action beats.

We break up the action by ‘cutting’ from beat to beat with considerable white space on the page, making it more inviting with a much easier grasp on the pacing of the scene.

Shane Black (‘The Predator’, ‘Iron Man 3’) has noted that action in a screenplay needs to have a sense of being read vertically as if the film is running down the page, rather than horizontally across the page in the usual fashion of reading.

“Pearl Harbor” Example

The key to good action writing is clarity and simplicity with strong visual elements that define a scene in distinct beats.

Let’s close with this stellar example, from Randall Wallace’s celebrated action sequence in “Pearl Harbor”:

EXT. PEARL HARBOR – DAY

The harbor lies quiet. It’s a sleepy Sunday morning. Children are playing, officers are stepping from their houses in their shorts to get the morning paper…

EXT. MOUNTAINSIDE – OAHU – DAY

Hawaiian Boy Scouts are hiking on a side of one of the mountains overlooking Pearl. Suddenly booming over the mountain, barely ten feet above the summit, comes a stream of planes.

The boys are awed. What is this?

EXT. PEARL HARBOR – DAY

QUICK INTERCUTS Between the approach of the Japanese planes, and sleepy Pearl Harbor…

— The planes, in formation, their propellers spinning, their engines throbbing…

— Pearl Harbor, with the ships silent, their engines cold, their anchors steady on the harbor bottom.

— The Japanese submarines heading in.

— The American destroyers docking, instead of going out to search for them.

— Another formation of Japanese bombers climbing high, into attack position.

— The Japanese torpedo planes drop down to the level of the ocean, their engines beginning to scream.

— The American planes bunched on the airfields.

— ON THE JAPANESE CARRIERS, Yamamoto and his staff huddle tensely, over their battle maps.

— ON THE JAPANESE CARRIER DECKS, the second wave of planes is being brought up and loaded with munitions…the Japanese flag snaps tautly in the wind…

— ON THE GOLF COURSE NEAR PEARL HARBOR, American officers are laughing on the putting green near the clubhouse, where the American flag droops from the flag pole, limply at peace.

— The Japanese planes roar down just over the wave tops of Pearl Harbor itself.

— Children playing in the early morning sun, looking up as they see the planes flash by. The children look.

— they’ve never seen this many, flying this low…but they are not alarmed, only curious.

The images come faster and faster, the collision of Japan’s determination and America’s innocence

See the distinct beats? They read like a movie: Action. Cut. Action. Cut.

It’s subtle, but it serves up a visual story while not interfering with the director’s interpretation of every beat.

This is action writing at its best!

Making Sense of the Screenplay Format

MORE GREAT SCREENWRITING ARTICLES

SUBSCRIBE FOR UPDATES

“Writing Action — Part Two” Copyright © Charles Deemer. All Rights Reserved.