When reading a script or recalling a film, we often idealize its vision and the picture is flawless in the perfect world of our minds. But as directors planning our own films, it’s an entirely different exercise.
Updated December 15, 2022
by Glen Berry, edited by Stavros Stavrides
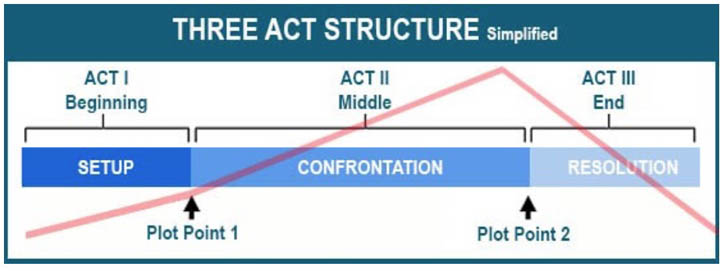
What Is A Shot List?
If you don’t know where to begin building your shot list, you need to get a read on the emotional content of your material.
The director studies the script and imagines how the scene will play visually. The process is called ‘breaking down the script.’ A director lists the types of shots that will ‘cover’ the scene. The list of shots is called a Shot Breakdown.
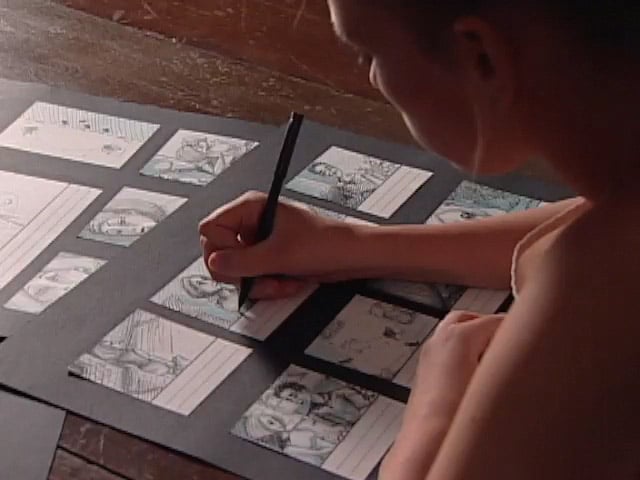
The Shot Breakdown is then communicated to the creative team as a Shot List, storyboard, or both.
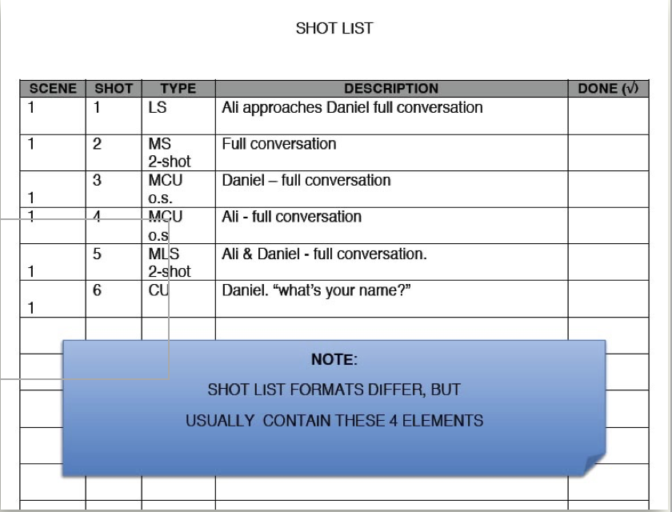
What a shot list does need to contain, at minimum, is a list of shots where each shows a description of the action and shot size – Long Shot, Medium Shot, Close Up, etc.
The shot number and its corresponding scene number help organize the shooting schedule. The list may then be organized into an order of filming on the schedule.
Building Your Shot List
When reading a script or recalling a film, we often idealize its vision and in the perfect world of our minds, the picture is flawless. But as directors planning our own films, it’s an entirely different exercise.
As visual people reading a script on the first pass, we may see the movie play out in our heads. The visual treatment plays as we go from line to line. However, as readers, we’re mostly feeling the effect as we read, not so much focused on the precise order of shots and how they specifically flow together.
Similarly, when we think back to our favorite movie, we can recall specific shots, effects, and sequences, but not every shot from every scene, the order of shots, how long each stayed onscreen, and how each transitioned into another.
If we were focusing on all that as an audience, and not hooked on the story, that film is in trouble!
When reading a script or recalling a film, we often idealize its vision and in the perfect world of our minds, the picture is flawless. But as directors planning our own films, it’s an entirely different exercise.
Once we’re past story structure and script, we need a well-developed idea of how the visual elements unfold in our movie. Creating a shot list, shot by shot, scene by scene, sequence by sequence, we make a plan.
It needn’t be perfect at first, but a strong vision of the outcome will guide us as we select various shot types, moving from master shots to close-ups, with purpose.
So once again, we face a blank page as we prepare to begin our shot list. How to begin? Let’s start with a scene.
REMEMBER: We are presenting a conventional approach to scene construction. As professional directors, we determine the key moments and plan accordingly, rather than select shots in a cookie-cutter template. However, if you don’t know where to begin, it’s a way to get started and depart from there.
This post is a support article for the “Shot Vocabulary” chapter in Cyber Film School’s
Multi-Touch Filmmaking Textbook
Breaking It Down
Many of us are aware that an entire film has a dramatic curve – beginning, middle, and end. We may have even identified the movie’s plot structure with ‘high points’ like:
- Exposition
- Inciting Moments
- Rising Action
- Conflict
- Climax, and
- Resolution
We’ll examine these High Points further below.
Where an entire picture’s structure may be analyzed with these high points, so can almost every scene of our script. Each scene may be structured in the same way, with its resolution at the end of each scene driving us to the next scene.
Think of a scene as a kind of visual paragraph. In literature, where a paragraph on the page is made up of sentences and words, a sequence of shots in a film makes up a scene.
Our task right now is to select the size and angle of each shot and sequence them to construct a scene.
Shot Size & Angle
In general terms, the Wide Shot (or Long Shot) is often expository, offering us factual information about the scene’s setting, and/or establishing the relationship between objects and the changes between them. In short, it’s the scene’s ‘setup’.
The close-up tends to be concise or expressive, calling attention to more specific detail meant to convey a specific emotional impact.
A Wide Shot exposes enormous amounts of information. It is commonly used as a tool for conveying large amounts of information to the audience – geography of the space, time period, setting, mood, activity, characters in the space, and all action taking place.
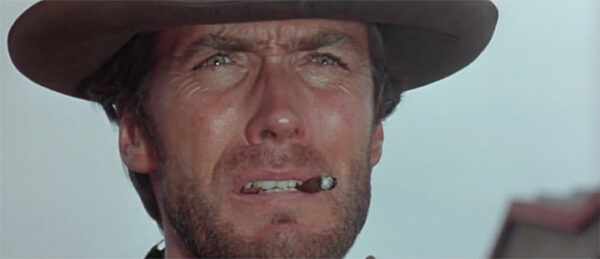
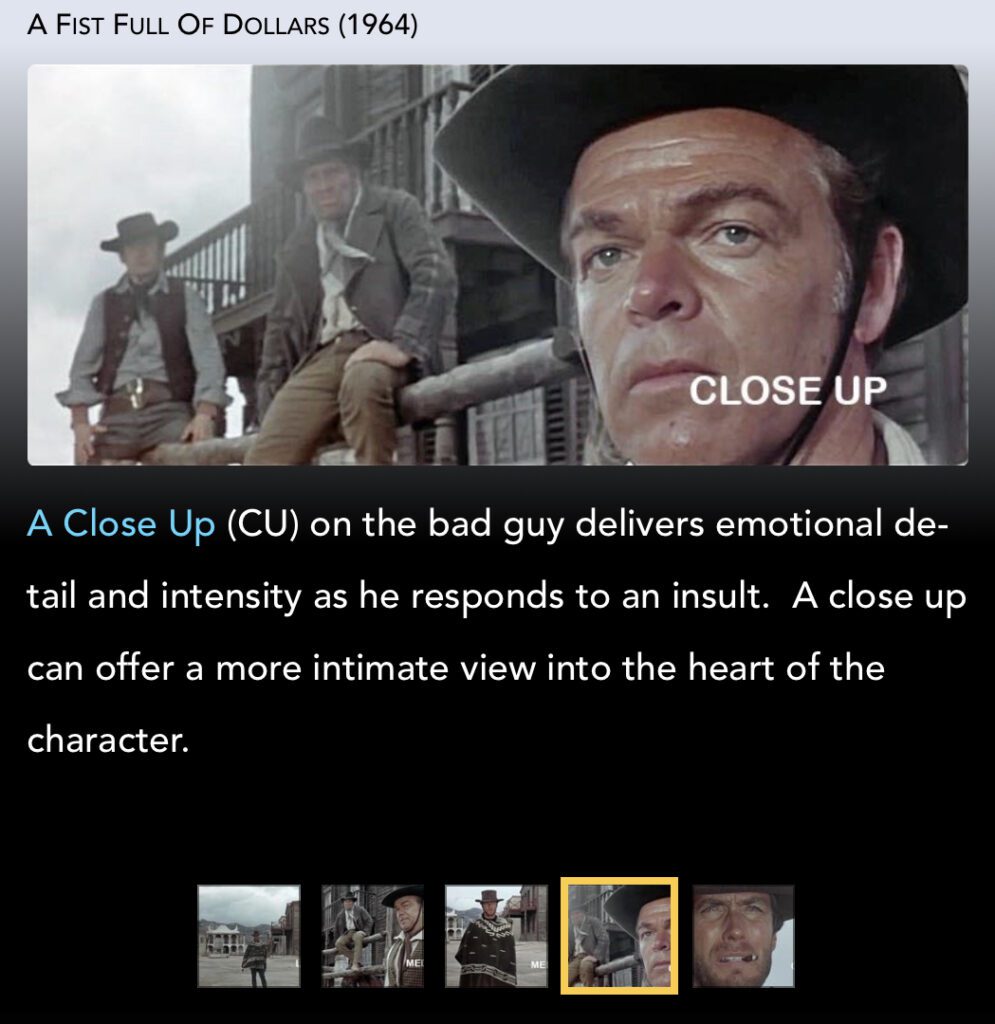
Compared to the Long Shot, the Close-Up is hyper-focused. It conveys context, emotion, or grandiose effect. Trained on a person’s face, it delivers emotional detail so the audience gets to feel the impact on the character and more closely identify with their circumstance.
Extreme close-ups are often used at the climax of the scene to heighten the intensity of the moment for the audience.
As the action rises toward the climax of the scene, a common technique is to ‘tighten’ the shots incrementally from the wide shot to a close-up.
A Wide Shot exposes enormous amounts of information. It is commonly used as a tool for conveying large amounts of information to the audience – geography of the space, time period, setting, mood, activity, characters in the space, and all action taking place.
If we were to stack up shots in the order of wide shot, full shot, medium shot, and close up, we would have the effect of ramping up the scene’s intensity as it progresses up the ladder of rising action of the dramatic curve.
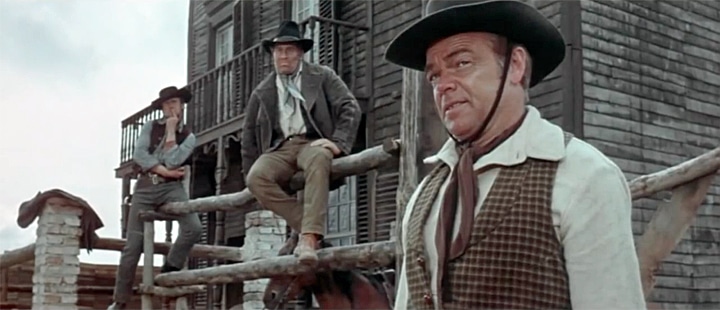
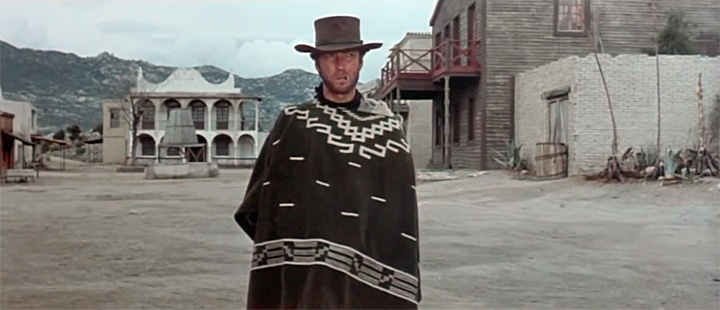
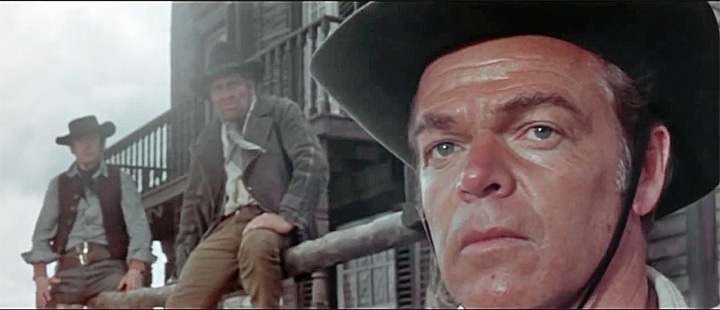
Here is an example of how the shots stack up in a sequence of rising action in a confrontation scene from the classic “A Fist Full of Dollars”, directed by Sergio Leone and starring Clint Eastwood as our protagonist.
1. Long Shot

2. Medium Shot
Compared to the Long Shot, the Close-Up is hyper-focused. It conveys context, emotion, or grandiose effect. Trained on a person’s face, it delivers emotional detail so the audience gets to feel the impact on the character and more closely identify with their circumstance.
3. Medium Shot
4. Close Up
5. Close Up

Full Scene Study
Now let’s study the actual scene. This scene appears in Act I of the movie and has preceding scenes and following scenes. The scene contains:
- Exposition
- Inciting Moments
- Rising Action
- Conflict
- Climax, and
- Resolution
As discussed earlier, we can find these elements in the dramatic curve of an entire movie, but also find them contained within one scene. First, we’ll identify these high points, then examine the scene’s shot construction.
Read the subtitles for cues. Then study the extended time-coded notes below the video.
The ‘High Points
At 0:00 – The Exposition in this clip begins with our protagonist talking to himself. This sets the stage for our conflict. He’s a killer looking for a job. “I don’t work cheap,” he says and is ready to show off his skills to a potential employer.
0:27 – We see this potential employer taking a watchful position on a balcony.
0:30 to 1:15 – The Inciting Moment begins as our protagonist walks a path of danger. He starts with, “Get three coffins ready” as he passes an undertaker and heads toward his targets, who notice him approaching.
1:15 – The Rising Action kicks off as he confronts the men. His conversation draws them deeper into a course of conflict with moments of escalation along that path.
1:55 – The Peak Moment when he throws back his cloak to reveal his gun. His intent to draw is the point of no return, as recognized by one of the antagonists in the foreground.
2:32 – The Climax of the scene, where the protagonist draws his pistol and kills the four men, the conflict is now resolved.
2:25 – With Resolution, the climax unravels. Note the shots now ‘relaxing with wider framing. The Sheriff appears to arrest our protagonist who refuses to acknowledge the Sheriff’s authority and walks away.
In our Denouement, what do we about the protagonist? He is a killer willing to provoke conflict, killing four men, then walking away in the face of authority.
If we were to watch this scene on its own, unaware that it is part of a larger film, we could easily assume that the protagonist is really the antagonist, since he is the one provoking the fight and doing the killing. However, as the hero seeks an apology from the men about insulting his horse in a previous scene, we get the hint that the men are mean-spirited killers who deserve some get-back.
Because this scene is part of a longer film, information, and events from previous scenes play into the conflict contained in this scene. Thus, the resolution to this scene is incomplete – not the end of the story. Rather, it sets the stage for the further conflict to come in later scenes.
This post is a support article for Cyber Film School’s Multi-Touch Filmmaking Textbook.
The Shots
From 0:00 to 0:30. We open with a Medium Shot (MS) for the exposition of our character and then transition into a long, wide shot. That is our establishing shot that puts the geography of the space into context. These are expository shots.
We then move into some tighter shots, some MS, and Over-the-shoulder two-shots. We then come back out to another wide shot at 0:52 to establish the geography of the corral at the other end of the street, but we’re still not as wide as the opening establishing shot. We have the same, wider shot on the reverse angle at 1:15.
From 1:16 to 2:32, our conflict, we see no more wide shots. We progressively move in tighter and tighter from MS and Two-Shotss to Close-ups. This is no coincidence as we move forward and up the slope of intensity on our dramatic curve, to increasingly tighter shots.
When our protagonist throws back his serape and both sides are committed to conflict, we see nothing but CUs from here to the climax (1:55 to 2:32). The moment of highest intensity is covered in CUs and ECUs.
Immediately after the climax of the scene, we back out of the tight shots for the denouement (2:46). We drop back off of the dramatic curve in terms of intensity and back out to wider shots, although it is an incremental step back from the height of the climax.
We stress once again: this is a classic scene construction, where wide shots are used for exposition and close-ups for the rhetorical. Wide shots are used in the beginning with progressively tighter shots going up the dramatic curve. The tightest shots, close-ups, are used at the climax and we back off to wider shots for the denouement
If you don’t know where to begin building your film’s shot list, you need to get a read on the emotional content of your material:
Where are the moments of greatest intensity?
What is expository (wide) and what is rhetorical (close)?
Where are the turning points of your scene?
Upon what does the conflict hinge and what actions reveal the nature of the characters in the scene?
If you can identify these moments, you will have an idea of how to use framing in a series of tighter or wider shots to heighten intensity and focus the audience’s attention on the moments in your story.
As the action rises toward the climax of the scene, a common technique is to ‘tighten’ the shots incrementally from the wide shot to a close-up.
NEXT: Scene Coverage: You Can’t Film It All >>
Preview our MultiTouch Filmmaking Textbook
Extreme close-ups are often used at the climax of the scene to heighten the intensity of the moment for the audience.
Here is an example of how the shots stack up in a sequence of rising action in a confrontation scene from the classic “A Fist Full of Dollars”, directed by Sergio Leone and starring Clint Eastwood as our protagonist.
If we were to stack up shots in the order of wide shot, full shot, medium shot, and close up, we would have the effect of ramping up the scene’s intensity as it progresses up the ladder of rising action of the dramatic curvA Wide Shot exposes enormous amounts of information. It is commonly used as a tool for conveying large amounts of information to the audience – geography of the space, time period, setting, mood, activity, characters in the space, and all action taking place.